French summary: Cet article détaille l'installation logicielle qui me permet de contrôler les systèmes électriques du bateau par informatique, à l'aide d'une carte Raspberry Pi. Comme il s'adresse à un public d'informaticiens et d'électroniciens, très majoritairement anglophones, il est en Anglais.
Edit: In a previous version of this post, I did data acquisition
through a separate process, with something akin to
os.execute("timeout 1.5s /dev/ttyAMA0 > /tmp/buffer_file"). Not only
was it overkill to read 200 bytes at 19200 bauds, it bugged under some
circumstances, not yet fully explained (I suspect some Unix signals
inheritance issues in Mihini's app_daemon, investigations are
ongoing). In the reviewed version, I'll just use uart=serial.open()
then uart:read() and be done with it.
(end of preliminaries)
As I've worked a lot in software engineering and telecom, embedded or not, I wanted to be able to log, remotely monitor and control the boat, and I felt compelled to do it myself. For that, I bought a Raspberry Pi, and planned to connect it with the various systems I want to monitor or control. This first post describes the first step: acquiring and reportingdata from the Victron BMV-601 battery monitor.
Those whose definition of "fun" differs from mine should look at Victron's Color Control GX, which requires more money but less time and fiddling.
System Overview
The boat has several energy sources:
when in a port, it can get electricity straight from the shore plug;
when unplugged, it has a fuel generator (some ancestor of SDMO's Diesel 6000 genset); handy and not-so-expensive to operate at around 1.5l/h, but noisy and stinky;
to limit genset usage, we've installed 12 Sharp thin-film panels, with an MPPT controller to feed their production in our batteries;
a 24V*430Ah bank of batteries, in order to store solar energy and to operate the genset at nominal power (those non-inverter groups hate to work in underload).
Except for solar charging and 24V appliances (navigation gear and a couple of lights), everything going to and from the batteries goes through a charger/inverter.
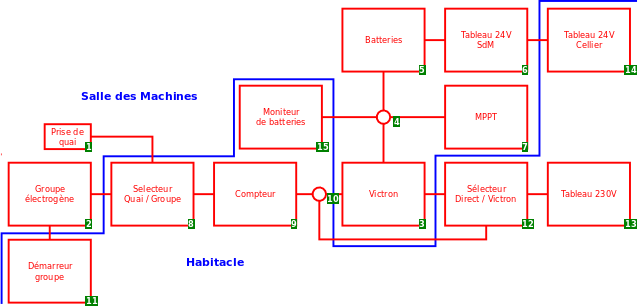 Overview of the electrical installation, excluding appliances (in French).
Raspberry Power Supply
I don't want the Raspberry to shut down when I cut the 230VAC, so I'll power it with the boat's batteries, which are 24VDC. DC-DC power converters come in two flavors:
Those which dissipate the extra volts in a resistor; with the Raspberry using 5V, it would yield about 21% efficiency, and about 10W of losses. About half of the fridge's consumption: nobody wants that.
Those which hash, transform and redress the current, to offer decent efficiency. That's what I'll choose.
For a couple of euros on eBay, you can find such converters based on TI's LM2596S. They deliver up to 3A, accept up to 37V and can bring it down to 3.3V. All it takes to tune their in/out ratio is a screwdriver.
BMV-601 Battery Monitor
The monitor has a serial output. Not RS232, but the bare minimum needed to talk with other embedded systems: a 4-pins interface (GND, +3.3V, TX, RX; no +5V, no flow control). The Raspberry also has a +3.3V serial line, on its side connector. So let's connect them together and see if we can get anything:
 Installation, viewed from the back
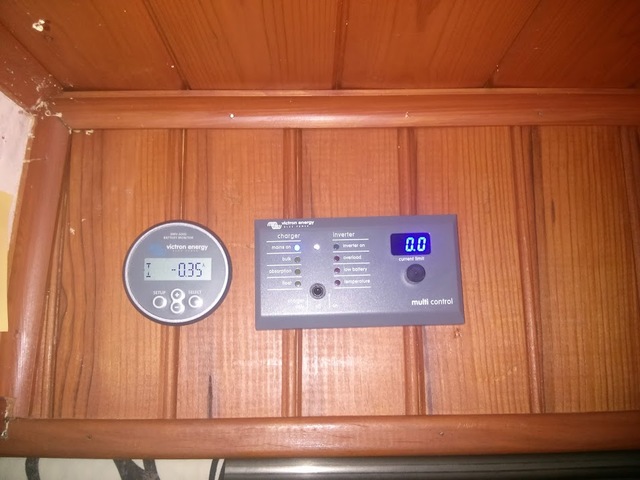 The same, viewed from the front
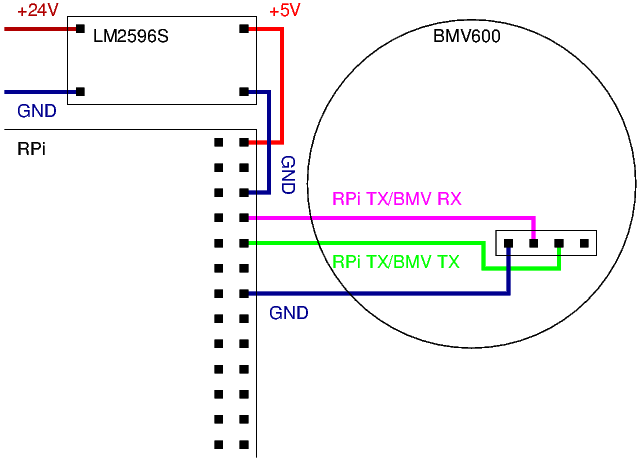 Wiring scheme
Note: although the Raspberry has a +3.3V output (facing the +5V in the corner of the card), it's not only useless to connect it to the BMV, it has a nasty side-effect: it resets the BMV whenever the Raspberry is switched off.
Operating System
There are several OS distributions for Raspberry. I chose Raspbian because 1/ I've been using Debian derivatives for more than a decade and 2/ Mihini is ported and tested on it.
Software Setup
By default on Raspbian, the serial line is used to serve a terminal. Let's disable that and reclaim the port for ourselves. Also, let's put a WiFi dongle (it'll save some wiring) and configure it.
Optionally, write your PC's SSH key (generally found in
~/.ssh/id_rsa.pub) in the Raspberry's ~/.ssh/authorized_keys. It
will save you from typing passwords when you log in.
Time to check if we see something on the serial port:
$ ssh pi@pi
$ stty -F /dev/ttyAMA0 speed 19200 cs8 -icrnl -ixon -icanon
$ cat /dev/ttyAMA0
V   26717
I   0
CE  0
SOC 1000
TTG -1
Alarm   OFF
Relay   OFF
AR  0
BMV 600S
FW  212
Checksum    ?
H1  0
H2  0
H3  0
H4  0
H5  0
H6  0
H7  26708
H8  26718
H9  0
H10 1
H11 0
H12 0
Checksum    ?
^C
$ _
Great :) Moreover, the protocol is pretty readable, and fully documented by Victron. Time to write a small program to digests this.
Mihini
Eclipse Mihini is a development framework, primarily targetting embedded Linux systems, which allows to easily create and deploy M2M applications in Lua. Since I've participated a lot in its architecture and implementation, the choice was obvious, besides the many inherent qualities of that system--if I may say so.
Porting Mihini to a Raspberry isn't difficult, and is thoroughly documented on Internet. As a bonus, and unsurprisingly for an Eclipse product, it has an excellent support from the IDE, including autocompletion, out-of-the box remote debugging, application deployment etc.
Data acquisition
Mihini comes with a serial interface, allowing to read line-by-line, or by arbitrary chunks, with optional timeouts. Some quick experiments have shown that reading line-by-line causes a lot of errors. It's not completely surprising, given the lack of control signals on the UART; I guess it also means that the Raspberry has little to no buffer on this UART interface.
Anyway, we'll just do a single read operation that's sufficient to acquire enough data to parse, i.e. at least two full frames. How much is enough? A quick test shows that I get 110 bytes long frames, so 220 bytes for two frames. If I read in the middle of a frame, I might lose up to 109 bytes, so I need to read ~330 bytes. Let's say 400 bytes to play safe.
The two frames are pushed on the uart every second, with half-a-second of time-shidt. 110 bytes = 880 bits at 19200 baud should go through in about 1/20s. The reading operation shouldn't block for more than 1.1s.
require 'serial'

uart = serial.open('/dev/ttyAMA0', { baudrate=19200 })

function get_raw_data()
  return uart:read(400)
end
Now, we can extract a sequence of two frames out of that raw
data. Indeed, the BMV keeps both instant informations about the
batteries' state, and some historical statistics. They're organized in
two frames; each kind of frame is written every second on the serial
line, as a series of "<label>\t<value>" lines; the last line of a
frame always has "Checksum" as a label.
function get_two_frames()
  local REGEXP = '\13\10Checksum\t.()'
  local raw_data = get_raw_data()
  local checksums = { }
  -- find 3 consecutive checksum lines in `raw_data`
  local last_position = 1
  for i=1,3 do
    local next_position = string.match(raw_data, REGEXP, last_position)
    checksums[i]  = next_position
    last_position = next_position
  end
  assert(frame_checksum(raw_data, checksums[1], checksums[2]-1)==0)
  assert(frame_checksum(raw_data, checksums[2], checksums[3]-1)==0)
  return raw_data :sub (checksums[1], checksums[3]-1)
end
Checking the frames for data corruption is fairly easy: the value
associated with Checksum is an 8-bits ASCII byte chosen so that the
sum of all bytes in the frame is a multiple of 256.
function frame_checksum(frame, a, b)
  local bytes = { frame:byte(a,b) }
  local sum = 0
  for i=1,#bytes do sum=sum+bytes[i] end
  return sum%256
end
Finally, we want to turn those raw textual data into proper Lua records, that will be easily exploited by the rest of the program:
function get_record()
  local frame = get_two_frames()
  local record = { }
  for line in frame :gmatch "[^\10\13]+" do
    local label, value = line :match '(..-)\t(.+)'
    if label~='Checksum' then
      record[label] = value
    end
  end
  return record
end
The actual code is slightly more sophisticated: error checking, some data conversion and a mutex, but the 4 functions above are indeed the core of my BMV data acquisition system.
Data Restitution
The simplest way to check the result remotely is through telnet. In a couple of lines of Lua, I can open a telnet shell, and use it to run my commands above. Notice that Mihini support collaborative multi-tasking through its sched module, which allows to run the shell and the data acquisition concurrently. Let's launch such a shell on port 3000:
local sched = require 'sched'
local shell = require 'shell.telnet'

-- Insert the BMV monitoring functions here --

function main()
  shell.init{ address='0.0.0.0', port=3000, editmode='edit', historysize=64 }
end

sched.run(main)
sched.loop()
On that telnet:
$ telnet pi 3000
Trying 192.168.13.100...
Connected to pi.
Escape character is '^]'.
Lua interactive shell
> :get_record()
= {
   discharge_average = 0,
   discharge_n_cycles = 0,
   time_to_go = -0.016666666666667,
   n_auto_synchro = 1,
   ah_total = 0,
   relay = "OFF",
   firmware = 212,
   state_of_charge = 100,
   discharge_max = 0,
   discharge_n_full = 0,
   voltage_max = 26.718,
   alarm = "OFF",
   consummed_energy = 0,
   n_alarms_voltage_low = 0,
   discharge_last = 0,
   days_since_full_charge = 0,
   n_alarms_voltage_high = 0,
   model = "600S",
   alarm_reason = 0,
   current = 0,
   voltage = 26.716,
   voltage_min = 26.708 }
> ^D
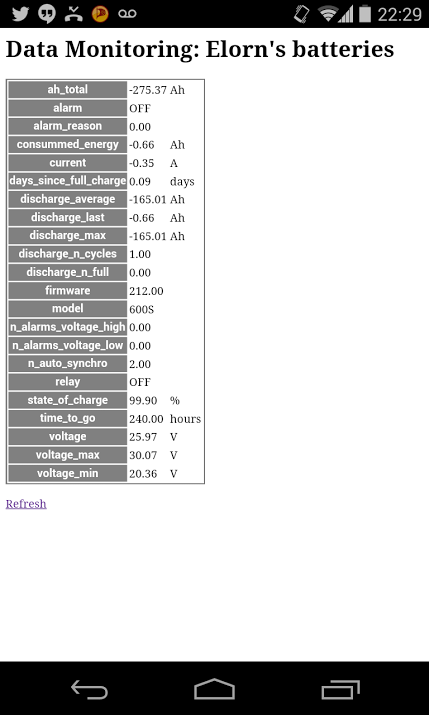
It works! For a more user-friendly approach, Mihini also comes with a simple web server. Nothing fancy, secured nor scalable, but enough to serve a couple of web pages or web services behind a firewall. We can write a simple data-dumping page:
require 'web.server'
require 'web.template'

web.site[''] = web.template 'default' {
    title = [[Data Monitoring: Elorn's batteries]],
    body = [[
    <table>
      <% for label, value in pairs(get_record()) do %>
      <tr>
        <th><%=label%></th>
        <td><%=value%></td>
      </tr>
      <% end %>
     </table>
     <p><a href=''>Refresh</a></p>
]] }
Add a web.start(9000) in the main() function, and we're set:
Further Improvements
The code outlined here was quick and dirty on purpose, to minimize the amount of code not directly addressing the issues. I've put the resulting program in a gist anyway, but you shouldn't reuse that. A much more proper version is available on github, with decent error checking and a somewhat more polished API.
Moreover, my solar panels controller uses VE.Direct as protocol, which is closely related to the BMV text protocol: the common code parts will be factored together.